Thursday, May 26, 2011

EASIER lasagna


I'm all about the Italian food...especially lasagna! That said, I've never been too skilled when it came to cooking the lasagna noodles and keeping them in tact!

So I loved it when I found this great recipe (pampered chef) for Inside Out Lasagna. Same ingredients practically, just easier. And just like all the recipes I seem to fall in love with, it's modification friendly in case you don't have something in your pantry :)

1 12 oz. box of your favorite pasta (tonight I had on hand whole wheat shells)
1/2 medium onion chopped
1lb of lean ground beef
1 26 oz. jar of spaghetti sauce
1 14.5 oz can of diced tomatoes, in juice
2 cloves minced garlic
4 eggs
1/2 cup parmesan cheese
2 cups Mozzarella cheese
32 oz Ricotta Cheese (I only had a 15 oz. tub on hand and it still came out terrific)
1 TBS dried parsley
1/2 tsp salt
1/2 tsp black pepper

  • Preheat oven 350
  • Cook Pasta according to box
  • Chop onion and put it and ground beef in skillet to brown over medium heat (8-10min)
  • Press garlic into beef mix
  • Stir in pasta sauce and tomatoes, remove from heat
  • In a mixing bowl, lightly beat eggs. Add cheeses, parsley, salt, and pepper. Mix well.
  • Assemble lasagna. Cooked pasta, meat mixture, then spoon ricotta mix over sauce. Spread evenly.
  • Bake uncovered, 1 hour or until ricotta mix is set and lightly browned.
Yields 15 servings (ha! yeah right if you're a mini-person)

~Amanda

Hooded Towels


Who doesn't love a freshly bathed babe all wrapped up in a hooded towel?!? The Crafty Mamas sure do! Unfortunately, when the little babes reach the age of 1, they tend to be too big for the infant hooded towels but not too grown up to not use a hooded towel. So, a few of of the Mamas got together and created hooded towels for our cuties! Crafty Mamas Hillary, Beth, and I participated in this group craft. We used a tutorial we came across on Not Just a Housewife. The tutorial was great with a lot of detailed pictures. The only thing we didn't do was the pleat she suggested to add to the back of the big towel. We weren't real sure what the purpose was, thought it might make attaching the hood a little more difficult, and consulted a store bought hooded towel I had on hand and discovered we'd just leave it out! It turned out to be a fairly quick and simple project. And there is so much room for personalizing and embellishing it is great!

Cuties Pinkerton & Cupcake in their new towels


Little Huckleberry left before we could get a group shot but Hillary did capture her little cutie showing off his new towel

Sharing secrets in their hooded towels

Sunday, May 15, 2011

Mickey Birthday

J Ark turned 2 last weekend and to celebrate we had a Mickey themed party.  Here are all the little touches I put together to make the party special and fun!

His very own shirt...got the idea from this blog
The birthday banner...again I got the idea from the blog above (it was exactly what I had wanted to do!!)
Cupcakes made with this low-fat recipe and marshmallow Mickeys!!

Treat bags filled with Mickey coloring supplies and a Mickey Rice Krispie treat (forgot to take a picture of those... oops)

Wednesday, May 11, 2011

Feeling Groovy Dress

I am SO in love with the newest dress I made for Cupcake! I just named it the Feeling Groovy Dress :-)


I stumbled upon Shanna's blog Celebrate the Madness and got super excited when I read she was doing a Dress a Day in May series! I instantly added her blog to my Google Reader and happily awaited her daily dress tutorials. One of the tutorials was the 10 Minute Twofer! It reminded me of the Ice Cream Social dress I created and blogged about earlier. After examining the tutorial in depth, I realized it basically was the Ice Cream Social dress without the sleeves. Since I already knew how to make it I was set to go!

I used fabric I found at JoAnn Fabrics that my fellow Mama, Hillary encouraged me to get - thanks Hillary! It isn't something I would normally pick out but I am SO glad I did. Shanna suggested embellishing the dress with a different fabric band on the bottom, so I went for it. This part made the project a little more difficult, but I love how it turned out and I like trying out new things and learning so it worked! I instantly knew I also wanted to embellish it with one of Jess' Fabric Flowers because, like I posted before I am obsessed!

I finished the dress last night and was so thrilled that the weather cooperated with me - after having so many rainy, cold days we finally have had a stretch of sunny warm days! Perfect for Cupcake to show off my latest creation!! Hope you like it as much as I do.
Perfect day to play in the grass, sporting the Feeling Groovy Dress
Beautiful little girl in a beautiful little dress. Yes I know the Mickey Crocs don't exactly match - she insisted on them. All I cared about was that she was wearing the dress, so I didn't mind!
How cool is she?!? She has all she needs: grapes, sunglasses, & her blankie

Monday, May 9, 2011

Easy Veggie Mac & Cheese

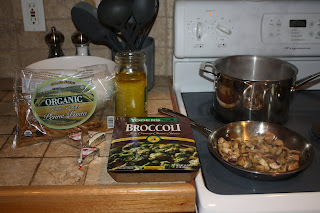
Step aside Rachel Ray...I did this in 20 min. Beth here and this is my first post! This is an easy recipe that tastes great and incorporates some veggies for kids that don't love them normally. I got the idea from a food network show (can't remember which one) but I figure she isn't going to be looking at my blog so she won't mind not getting credit.

Ingredients:
3/4 pound of whole grain pasta
1 package of broccoli with cheese sauce (can be frozen)

3 wedges of soft cheese
6-7 large mushrooms (large chopped)
2 Tbs. olive oil
salt, pepper, and garlic powder

1. Saute mushrooms in olive oil and add salt, pepper and garlic powder about half way through cooking. Cook till browned but still a little firm.

2. While mushrooms are cooking prepare pasta and broccoli using directions on packages.

3. Mix everything together till combined and serve!

This is a super easy recipe and makes 4 servings with only about 450 calories per serving.


Sunday, May 8, 2011

Hand-Me-Downs get Done Up!

Good Evening and Happy Mother's Day to all the Mamas out there!

Cupcake and I are incredibly lucky to have a huge family full of little ones. Along with lots of fun family gatherings, we are also fortunate to receive lots of hand me downs. It is such a wonderful feeling to not have to really purchase any clothes for Cupcake! We are blessed.

As to be expected, along with hand-me-downs, sometimes comes stains. Before my sewing and crafting days, I looked at stains as the enemy. I would try all my stain removers in the house and do my best to remove the dirt. Typically, I ended up having to get rid of the clothes because I just couldn't ever get rid of the stain!

Now, I welcome the challenge of a stain! Now I don't throw anything away, which is one of the reasons I eventually want a house with my own craft room but that is a whole different story! I spent some time redecorating three different stained garments and was really happy with the way they turned out.

Here is the first of the re-dos. I used a tutorial from Peanut to Princess to create this one. This was my first attempt at creating ruffles which was a little difficult for me, but I eventually figured it out.

I think my second re-do was my favorite! Probably because I love this top and I now am in love with these flowers from Craftiness is not Optional. Seriously, I love these flowers - I'm thinking hair clips, dresses, and so much more! Thanks again to Jess at CNO for all her wonderful tutorials. Yes, I am a little obsessed.

This last re-do I just thought up myself, aren't you impressed! I used some ribbon and scrap fabric to make the flowers. I used a wide zig-zag stitch to adhere the 'stems' to the shirt. Then, I used HeatNBond to attach the flowers to the shirt. Lastly, I hand-stitched around the flowers and created the center of the flowers with french knots.

Can't wait to put the old new shirts on my little Cupcake!! 


.

Color Books

So here is where our whole group crafting idea got started - color books. I found this tutorial when browsing through a few a million or so craft blogs and forwarded the link on to a few of my fellow crafty moms.

Instantly, Crafty Mama Sara jumped on the idea. She had a box full of scrap fabric just waiting for a project like this! So a few of the Mamas met and figured out what felt and fabric were needed and started cutting and planning. We thought this would be a fairly simple project. 5 group meetings later, we finally completed the books! Although it took a little longer than expected, we enjoyed creating them and were happy with the results.

Most of our little ones checking out their Color Books
Close up of Cupcake's Color Book
A lot of the kids loved the Elmo page!

Friday, May 6, 2011

Dish Towel Momento

Our last crafty get together was Mother's Day inspired! We wanted something our kiddos could give to the grandma's and so hand printed towels it was! Just a white dish towel, a little fabric paint, and about 10 hands to help hold onto the wet squirmy toddler hands! (We found it worked best to use a paint brush to apply paint to their hands instead of dipping their hands into it.)


I rummaged through my recycled ribbon and found this cute polka-dot one from a diaper cake I was given, so decided to wrap them up (napkin style). Then making a little folded card over wooden skewer (broken in half) to personalize it for each of the grandma's.


Amanda

*Jennifer here to add a few more pictures to the mix! I got some action shots of the little ones creating their masterpieces and I thought I would share. Enjoy!
Little Junie didn't know what to think about the whole ordeal!
Mama Katie & Mama Beth working to get Pinkerton's handprints


Baby Gia slept right through it all!
All the kids did an excellent job cooperating with the craft. The Mamas were a little afraid it might be disastrous but it turned out great! As Amanda said,  the key was painting the kids' hands as opposed to dipping them. Way to go Mama Sara for thinking of that one! 


Tuesday, May 3, 2011

Homeade Icecream...ONE INGREDIENT!

This is so ridiculously EASY and equally delicious! It's one ingredient...FROZEN bananas!

Take some bananas that are pretty ripe, peel them, and cut them up into chunks and freeze. Once frozen, put into a food processor and process. You'll do a lot of scraping down the edges, but eventually (a minute or two) it begins to get this awesomely creamy texture. And this is where I decided to add a bonus ingredient...Peanut Butter. Options are endless of what you could mix in.

So I feel like I'm eating ice cream, when I'm just eating a fruit! Here's one of the sites where I've found this idea.

Enjoy.

Amanda